martes, abril 12, 2022

Admin GA4 with Google Spreadsheet

Yesterday I tweet that I saw that recently Google Spreadsheet added the Analytics Admin service for Google Analytics 4 (GA4). This built-in service help us to code easier with other Google Products(1).


What this means? That we can use the API of Google in our Google Spreadsheet. This bring us a lot of versatility to, for example, list all the GA4 Accounts, or all the GA4 properties... Or even create new ones. In this example I'm only going to show you how to list the GA4 Accounts and the GA4 Properties that you have read access, but you can do anything that the API allows you. And it can be coded in our Google App Script and output in our Google Spreadsheet. If you want to have a look about all the possibilities, here's the official documentation.

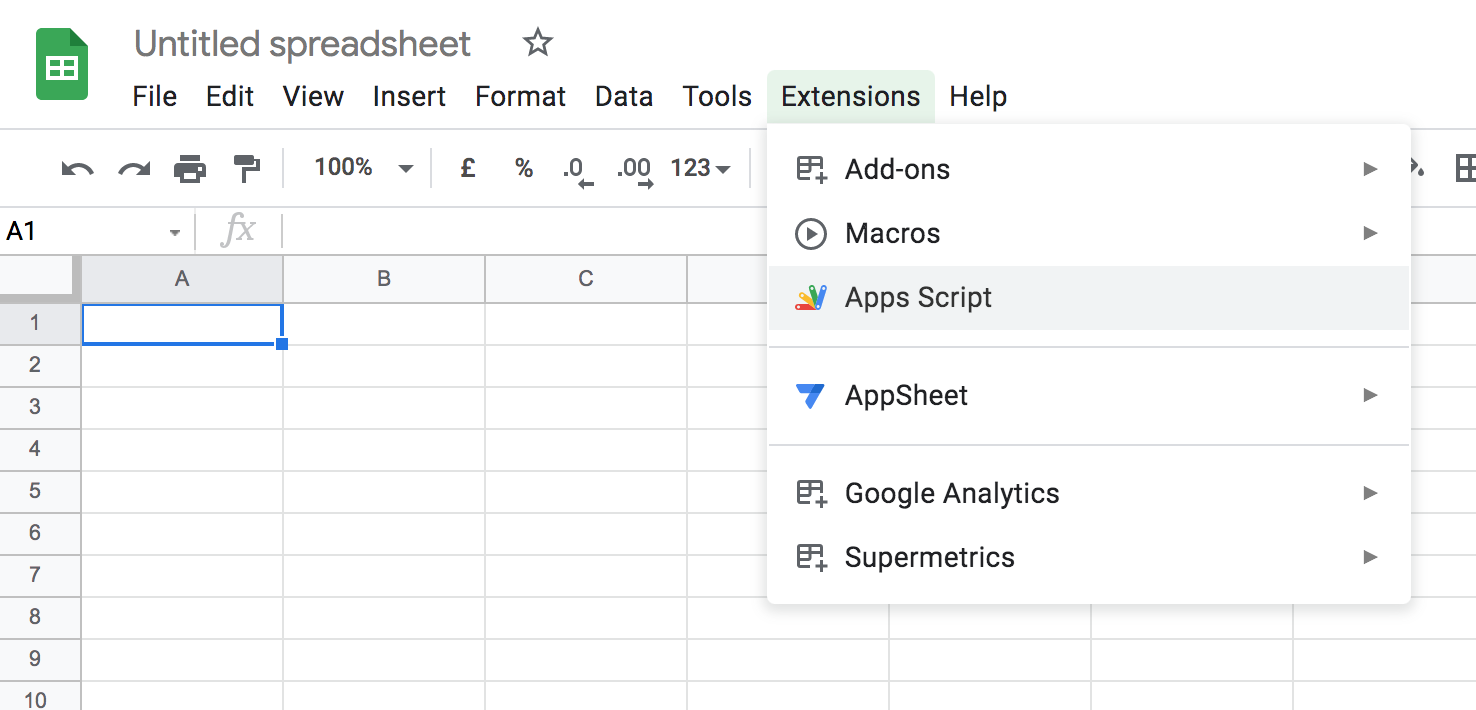
So, first we need to create a new Google Spreadsheet, and click in Extensions --> App Script

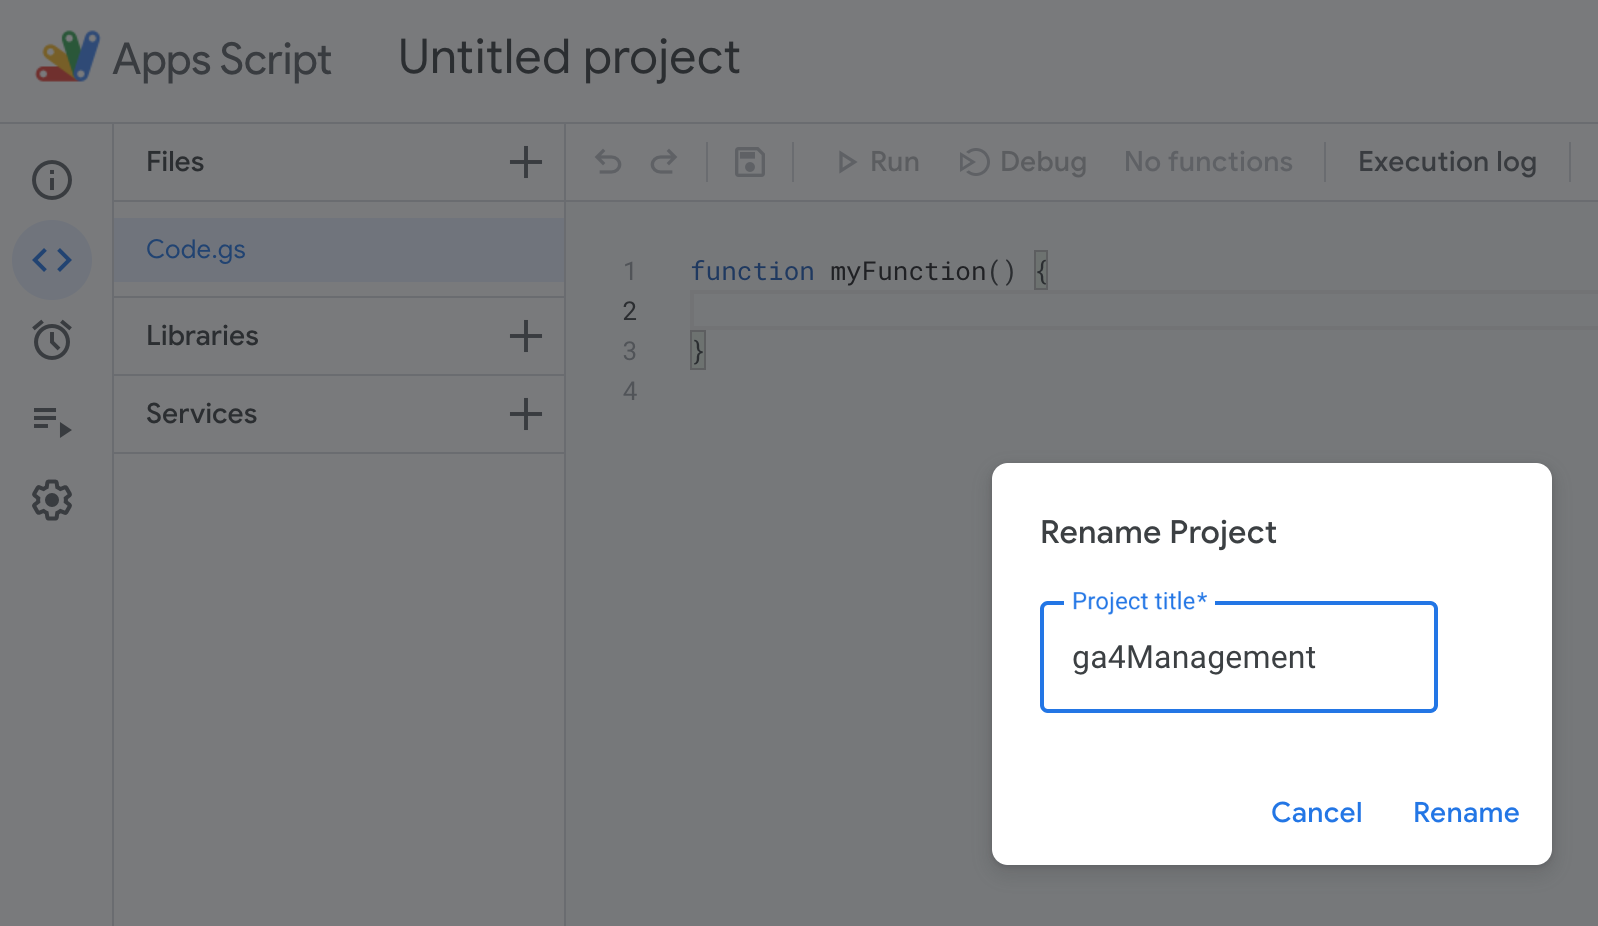
Once we are there we can rename the project with something that identifies it, in our case it can be ga4Management, for example.


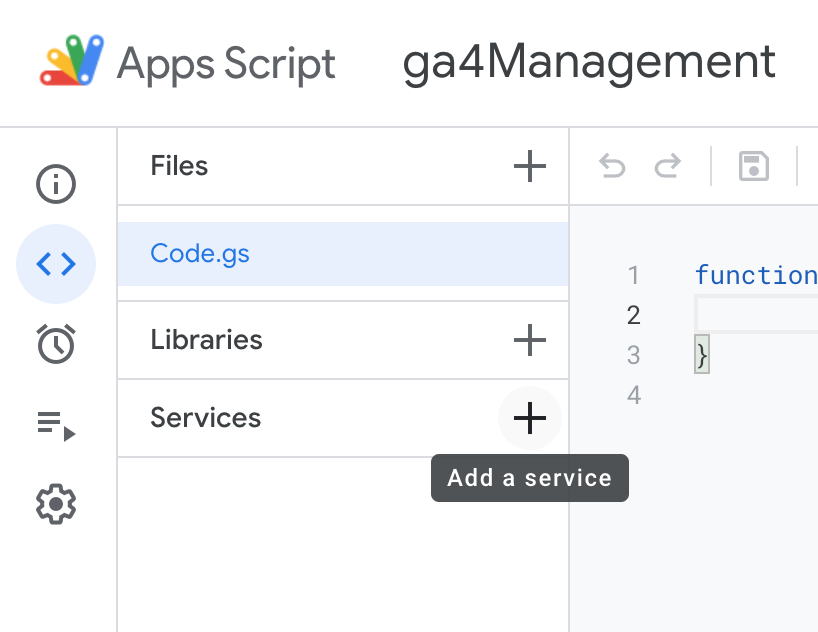
Now we need to add the built-in service we have been talking about. For that, we click on the + button (Add a service).


And we click on Google Analytics Admin API, and press the add button.


Besides, we are also going to add another built-in service that will help us to create new sheets on the spreadsheet and other features related with the spreadsheet itself.

The Service is called Google Sheets Api, and for invoque at it, instead of using the object Sheet, I renamed by SpreadsheetApp


After that, the rest is coding, but don't worry readers, at the end of the post, I'll share with you a copy of the Spreadsheet and you can make a copy of it in your own Google Drive. I've tried to commented it and also include console.logs in case you want to debug it.

For last, just mention that in the beginning of the code there's an onOpen function that runs when we load the spreadsheet but as we are creating it now, we are going to force this method to arrange the proper permissions.

Et voila, first time you click on run, for the onOpen function.

And it will ask you for permissions:


So you will have to click in advance

And then select the option that ends with (unsafe). 


Next window will inform us about the permissions we are going to grant to this app using our gmail account, and click on Allow


We click on Run again with the difference that it will appear execution completed instead of asking us for permissions.

Piece of cake, once the execution is completed, a new menu on our spreadsheet called "GA Management" will appear

Using this menu, now we can list all our GA4 Accounts and all our GA4 properties.

And that's all folks !!!

This is the link of the Google Spreadsheet.


lunes, marzo 15, 2021

List all custom dimensions and metrics of your Google Analytics properties using G Management API and Google Apps Script (GAS)

Well for once in many time, actually I think the first one I’m not gonna talk about GTM. This time I’m gonna dedicate this article to GAS, Google Apps Script. Some people will call it scripting other ones will say it can’t be considered as that, well readers, judge by yourselves and make an opinion in this overall view.

In this article I’m going to provide you a google spreadsheet where you can get a list of all your properties of Google Analytics and also extract all the custom dimensions and properties from a Google Analytics property.

The only thing that is required here is to have Google Analytics properties with custom dimensions or custom properties and google drive for creating a Google Spreadsheet.

I have created a customised menu where all the functions are allocated there. The menu es called “GA - Lists” and is loaded when you open the Google Spreadsheet.


For checking all the code behind the scenes, you only have to go to “Tools”. And the script editor.


It will open a new tab with all the code behind. I know I should have cleaned the code because it contains more lines that the ones we need for get a list of all our Google Analytics views, and the custom dimensions and properties of each property.

The reason behind is that I created before a script to iterate with all the properties and extract all CDs and CMs but in my company we have a bunch of properties and each of it contains another bunch of CDs and CMs. When I tried to run this script, it happened that I exceeded the time for it and I got a time out. For sure there’s someone outside there smarter than me (actually that’s not hard to find) and have another idea of how to retrieve them without a timeout error.

I have created a tab called README that is self-explanatory, explaining what every part of the menu does.


So first thing: List of views that you have access to Google Analytics (GA). Chop chop, click on “GA – Lists” --> “List Views” --> “List all Views”.

It will empty or replace the tab “ALL VIEWS” and will write down all the views you have access to GA.

You can check line 97 of the code in the function getGAViews().


If you want to know all the properties that you have access of GA, same old same old: “GA - Lists” --> “List Properties” --> List all Properties. You can find that part of the code in the line 121 in the function name getGAProperties().


Now it comes the tricky one, if you want to extract all the CDs and all the CMs of a GA property, you first you need to know the property ID “UA-123456-1”, this is why I created the “List all properties”. 

So, the only thing you need to do is copy the UA property ID and then when you run the menu it will prompt you for the property ID. Don’t panic this prompt is pretty and despite of my shitty English you will perfectly understand what I mean about.

Then “GA - Lists” --> “List CD & CM” --> “List all CD and CM for a property ID”


As you have already copied the property ID, for example “UA-123456-1”, when you got this popup, paste it on the text box and click OK


It will create a new tab with the name if the ID and all the custom dimensions and metrics under that property

More info in the code on line 223, function name ListCDAndCMPerProperty()

And now, the time you’ve been waiting for: here you can have view access to the document. Feel free to copy to your G Drive and don’t forget to mention how much you love damupi for making your life easier.

Live long and prosper. 


martes, marzo 02, 2021

Fire a tag in GTM once per user, using tag sequencing


Last week the marketing guys asked me to include a Floodlight pixel on the website. From now everything looks fine, but then taking to the agency, they told me to fire the pixel only once per user.

First thing that came to my mind was “why they need me to fire it once per user if we can handle it in the Floodlight built-in pixel itself?”


But then, the agency said this feature only has a 24 hour’s timeframe. OK, don’t panic. We have the Google Analytics cookie (_ga by default) so my plan B was: Check if the user has the GA cookie and if not, fire the tag.

However, life is never like is planned and there are other dependencies, in my case, the Consent Management Platform. Let me give you summarize background to explain you how it works.

First time, user lands on the site, it gets the cookie disclaimer. If the user consent, then an event, let’s call it “consent” allows you to fire the pixels from the page.

So, my problem was that at the time the pixel should fire, I already had the _ga cookie, so I couldn’t evaluate if it was a new user or not. Then I saw this article from Simo Ahava and got the update from dusoft and Stephen Harris talking about the set of the dataLayer, try to make it work but it didn’t. 

However, I started to spike about the set method of the dataLayer and ended in this article of Dan Wilkerson written more than 5 years ago with this beautiful code:

<script>
  (function(window) {
    var gtm = window.google_tag_manager[{{Container ID}}];
    try {
      gtm.dataLayer.set('balloonsPopped', undefined);
      // Notifies GTM our HTML Tag has finished
      gtm.onHtmlSuccess({{HTML ID}});
    } catch(e) {
      if({{Debug Mode}}) throw e;
      // Notifies GTM our HTML Tag has failed
      return gtm.onHtmlFailure({{HTML ID}});
    }
  })(window);
</script>

And this is where I saw the light: maybe I can’t control when something is going to fire because is asynchronous, but I can say to GTM if the pixel has succeeded or it has failed.

OK, so let’s get into the hot:

First we create the variable for reading the Google Analytics cookie (_ga):


Then what I did was to create a custom HTML tag for evaluating if the _ga exists, when the GTM is loaded, and therefore, before the “consent” event happens.


This is the code

<script>
 (function() {
    var gtm = window.google_tag_manager[{{Container ID}}];
  try {
    if ({{Cookie - _ga}}) {
// if _ga exists is NOT a new user and we fail the tag
      gtm.onHtmlFailure({{HTML ID}});
      return false;
    } else {
// if _ga does NOT exist is a new user and he tag succeed
      gtm.onHtmlSuccess({{HTML ID}});
      return true;
    }
  } catch(e) {
    if({{Debug Mode}}) throw e;
    return gtm.onHtmlFailure({{HTML ID}});
  }
 })();
</script>

And this is when the GTM container loads


Reader, one advice here: PLEASE, USE THE F*CKING NOTES on GTM to help your mates.


Then, once we have the 2 tags set up, we have to arrange the sequence of firing. This is where Tag sequencing come into scene:


With these 2 checkboxes I don’t know at what exactly time the Floodlight tag is going to be fire. But, I can be 100% sure, that is going to be fired after checking if it’s a new user, and if the tag hasn’t failed.

Finally, don’t forget to include the built-in variables needed for the custom HTML tag:


And that’s all folks. There are also a lot of things you can do like create a function name for checking if it’s a new user and call it in another tags or variables but that’s another topic.

Live long and prosper.


lunes, octubre 09, 2017

Schema in GTM using DOM scrapping

It seems it has been ages since the last time I post here. Well, not ages, but last year at least. Even this time I'll 'try' (and I mean try because my English is not so good) to write it in English as I moved a time to another country where they speak in English. So, to my Spanish readers, my apologies in advance, if you need something, I bet you know how to catch me and I'll be please to explain it in Spanish too.

Anyway, intro apart, this time I will write about something we did in the actual Company I work for. The post is not new and it's based on this big one: Using Gooble Tag Manager to dynamically generate a Schema Tag. I will write down more because, as the silly person I am, the most difficult part from me, was to extract the data from the DOM elements that were already on the page to create the JSON schema on the fly.

Speaking of DOM scrapping, it also has to be with my last post on how to retrieve values from that DOM, but this time, using GMT built-in variable, instead of querySelector javascript function. One thing that helps me so from a better understanding was the mozilla developer page attribute selectors . But all of you that know me a bit, know that I prefer to show it to you with examples, so, here we are.

By example we are going to use the same example I used last year, so if we go to http://www.damupi.com/test/damupi/index_en.html we will find this page:


And this is the source code:


Imagine that I want to create an schema like the following one, and you want to retrieve all the data from the page to create the JSON file on the fly:


And you want to retrieve all the data from the page to create the JSON file on the fly.

Let's start by getting the name "Suzuki". In GTM, go to variables and create a new variable like and, for example, call it "Schema product name - DOM":


As you see on the source code I start looking for a div with a specific class and then I drill down till the next element, which in our case is an img, with the attribute "type" equals to "brand". Let's say this is an example an in this particular case we could just get the value directly from "img[type="brand"]" but I have preferred to write you down like this because normally, all the pages have a lot of source code and the only thing for drilling down is to do it like this.

Check GTM preview mode to test if your expression is right or not


Let's do the same for getting image value for building our Schema JSON file. In this case we are going to retrieve the image value for the same element but a different attribute, so the only thing we are going to replace is "alt" per "scr".


Test it again in GTM preview mode:


And finally, following the instructions of Chris Goddard we can build the json we want to.


sábado, febrero 04, 2017

Insertando un pixel de Facebook: DOM element scraping con Google Tag Manager

A cuantos de nosotros no nos ha pasado que nos llegue un compi de marketing y nos diga que de la noche a la mañana - y si fuese posible para ayer - van a hacer una campaña de marketing superideal y que necesitan etiquetar unas cosas.

Tú, super analista digital que vas sobrado y que crees que has etiquetado perfectamente todo tu site, le preguntas a tu compi qué es lo que quiere medir y.... te enseña una parte que se te olvido etiquetar. Para colmo no puedes contar con los chicos de IT porque son muy malos y no te quieren, o porque a pesar de que te quieren mucho, tienen una cola de trabajo y las tareas de implementar analítica se encuentran relegadas a la ultima posición de cosas por hacer.

Ante esta perspectiva, no queda más que darle un poco al ingenio y hacer alguna ñapa que otra: Por suerte o por desgracia, Google Tag Manager dispone de un par de variables que nos pueden ayudar. La primera de ellas es la de elementos DOM, y la segunda es la variable javascript. La documentación oficial la podéis encontrar en este enlace. Y si queréis leer al dios Simo, tenéis su explicación en este otro enlace.

En mi caso, lo que me paso, consistia en implementar los típicos pixels de facebook, con sus acciones de pagina vista, búsqueda, añadir al carrito y compra. En mi caso la cosa estaba un poco más jodida porque casi todos los eventos (búsqueda, añadir al carrito y compra) estaban en la misma página y no podía crear triggers en Google Tag Manager en función de la página vista. También tuve que descartar que los tags se lanzase en funcion de unos triggers que escuchaban unos eventos que ya le había dicho a IT que los configurasen porque no estaban. ¿Qué hacer?. Pues bien, como no hay nada imposible para superdamupi, cree los eventos con funciones javascript que leían los valores de las variables y en función de los valores de estas variables, se lanzaba el tag o no.

Como ya me estoy enrollando, voy a hacer un ejemplo como si quisieramos implementar el pixel de búsqueda de facebook. Para ello, he creado una página de ejemplo en mi dominio que podéis acceder desde el siguiente enlace. El ejemplo que os he puesto tiene una pagina con dos campos de texto y el botón buscar.

Normalmente en los ejemplos que hay por internet, el código de la página, o bien tiene un id el control que estamos buscando, o bien la página tiene poco código html y el elemento DOM es relativamente fácil de recuperar. En el ejemplo que os pongo lo es, pero creedme cuando os digo que puede que haya páginas cuyo codigo sea un maldito infierno.


Cuando eso os pase, para recuperar el valor de un elemento DOM, yo creé en GTM una variable javascript que no es más que una función que recupera el primer elemento con la clase que le indiquemos. Por eso, por muy complejo que sea el código de tu página, y aunque no tenga un id, siempre podremos recuperar el valor de ese elemento DOM. La funcion javascript se llama querySelector.

Así que con esta función, en nuestro Google Chrome (supongo que se podrá hacer lo mismo con Firefox) nos vamos al elemento que queremos y le damos con el boton derecho en inspeccionar:


Una vez que tenemos el control, tenemos que saber qué propiedad de ese elemento nos va a devolver lo que está escrito en ese control de texto. Yo normalmente suelo comprobarlo con 3 propiedades: innerText, innerHTML o value. En el ejemplo que os pongo, el método que nos vale es "value"


Pero imaginaros si no os funciona value... en ese caso, sustituid las líneas de arriba en lugar de "value" por "innerHTML" o "innerText". En el caso que me paso, era innerHTML. El código en la consola es el siguiente:

var filtro1 = document.querySelector('body > div > div > div:nth-child(2) > input');
var filtro1Str = filtro1.value;
filtro1Str = filtro1Str.trim();
console.log('El Filtro1 es: ' + filtro1Str);

De esta manera, la última linea, console.log, nos va a mostrar si recoge o no ese control. En este caso nos devuelve "Hola", que es lo que he escrito en el cuadro de texto.

Una vez que tenemos identificados los selectores y sus controles para recuperar lo que introduce el usuario, es el momento de crear esas dos variables en tag manager. Nos vamos a variables, elegimos Custom Javascript y pegamos la funcion:


Para los que son tan vagos como yo (...o más), os copio el código de la función:

function(){
var filtro1 = document.querySelector('body > div > div > div:nth-child(2) > input');
  var filtro1Str = filtro1.innerText;
filtro1Str = filtro1Str.trim();
  // console.log('El Filtro1 es: ' + filtro1Str);
  return filtro1Str;
  }

Ahora hacemos lo mismo con el filtro 2, es decir, inspeccionamos el elemento, nos vamos al código fuente que está resaltado, y en windows (no tengo un Mac, si alguien se siente altuísta que me mande un DM) con el boton derecho --> Copiar --> Copiar Selector.... Y de nuevo los mismos pasos que para el filtro 1.


En GTM lo mismo, creamos otra variable para el filtro 2


Ahora lo que necesitamos es un trigger en nuestro GTM que diga algo como: "cuando tenga rellenos los dos campos de los controles de texto y le de al botón buscar.......". Para ello tenemos que hacer un trigger de tipo click, porque queremos que se lance cuando el usuario haga click sobre el botón Buscar. Para ver como se llama el click ID o la class de ese botón, abrimos GTM en modo preview pulsamos en el botón de búsqueda y nos vamos al evento gtm.click y a variables para ver alguna variable que nos pueda servir como referencia. En este ejemplo podemos coger "click classes"


En este ejemplo, el valor que nos da click classes cuando hacemos click sobre el botón es "btn btn-lg btn-primary btn-block".

Ahora es turno de la creación del trigger, en este ejemplo lo he llamado "Click Boton Buscar";  así que ahora construimos nuestro trigger diciéndole algo así como: si los controles de texto están rellenos y me pulsas ese botón.... entonces me lanzas el tag que yo te diga. Así que como diría jack el destripador, vamos por partes:

Si el control de texto filtro 1 está relleno:

{{damupi - CJ - filtro1}} -- does not mach RegEx -- (undefined|^$)

Si el control de texto filtro 2 está relleno:

{{damupi - CJ - filtro2}} -- does not mach RegEx -- (undefined|^$)

Y se hace click sobre el elemento con las clases:

click classes -- equals -- btn btn-lg btn-primary btn-block


Ahora ya solamente nos falta poner el tag que queremos, que en este caso, sería el pixel de facebook de búsqueda. La documentación dice que el pixel sería este:

fbq('track', 'Search', { search_string: 'leather sandals' });

Como nosotros queremos también saber lo que busca tanto para el filtro 1 como para el filtro 2, concatenaremos la cadena de búsqueda unida por un guión, retocamos un poco el tag de facebook para que incluya los dos campos. El pixel sería así:


Nota: recordad cambiar vuestro id de facebook

Y ya está :)


martes, enero 17, 2017

No te espían, solo quieren vender más y en ocasiones... nos conviene

Hoy me ha pasado una cosa muy curiosa que quería comentar con todos vosotros. Está ligada con la analítica pero no directamente. Muchas veces, cuando le digo a la gente a qué me dedico me contestan que Google nos espía, que sabe todo de nosotros y cosas por el estilo.

Sin tener en cuenta lo que destapó Snowden y Wikileaks de Assange, las empresas no nos espían, simplemente quieren que compremos más. Si nos ponemos a ver un hotel en Málaga, lo más probable es que luego nos salgan banners de hoteles baratos en Málaga. Eso no es espiarnos, es, simplemente, ofrecernos un producto o servicio que saben que estamos interesados.

¿Y por qué cuento todo esto? Pues bien, hoy recibo una carta de Francia. Mi primera reacción es de sorpresa porque a parte de visitar París dos veces en mi vida (la segunda de ellas Louvre incluído); yo no tengo ninguna relación con nadie de Francia.

Pues bien, la carta era esta:


Resulta que hace 4 años me compré un patinete en Decathlon. En concreto el modelo Town 9. Lo pagué con mi tarjeta de Decathlon y ahora este, no porque me espiaba, sino porque registró mi venta, al haber detectado un defecto de fábrica, me avisaba de que "NO UTILIZASE ESE PRODUCTO" y que me tenían que realizar un diagnóstico. El motivo de la carta, es que se ha detectado una debilidad en el manillar.

Pues bien, llego allí (No se lo digáis a nadie pero me pasé en patinete aunque en mayúsculas me decían que no lo hiciese XD ) y me lo revisan y me dicen que en efecto, es un producto defectuoso y que me van a devolver el dinero del producto que compré.

Es decir, Decathlon, motu proprio, me manda una carta y... pasados 4 años, me devuelven el importe de lo que me costó el patinete.

La historia hasta aquí seria magnifica por parte de Decathlon, pero aún fue mejor, es más, yo la calificaría de excelente por lo siguiente que os voy a contar: Resulta que a mí el patinete me mola. Voy con mis sobris a montar y soy la envidia de todos los padres cuando nos ven felices rodar. Así que me subí a comprar el mismo patinete: un Oxelo Town 9. Subo, con los 129 € que me habían devuelto, pido el patinete peeeeeero, ahora cuesta 20 € más. La dependienta me empieza a hablar de nuevos materiales, nuevos diseños y blablabla. Le argumento que no es justo porque blablabla y vamos a hablar con el jefe de planta.

Yo ya me veía redactando un post incendiario y twiteando como un troll pero al contrario, le enseño la carta, y el jefe de planta le dice a la dependienta que me cobre el patinete a lo mismo que me costó, es decir, 129 €. Que como es un producto defectuoso tengo derecho al mismo patinete aunque ahora cueste más caro. NO ME LO PUEDO CREER: no solo me devuelven el dinero sino que me dan la opción de cambiarlo por otro igual sin coste por mi parte.

Moraleja: Si no hubiese pagado con mi tarjeta de Decathlon y no me hubiesen "espiado", ahora podría tener un inútil patinete de 129 € con el manillar partido. Por lo tanto, no nos espían solo quieren ganar dinero, y en ocasiones, hasta nos es útil. A Decathlon le ha dado igual si yo era hombre, mujer, mi rango de edad o mis estudios. Lo que ha hecho ha sido mandar una carta a todos los que compraron ese patinete defectuoso.

PD: Impecable el servicio de Decathlon. Hacía tiempo que no recibía un trato así.

jueves, abril 14, 2016

Actualizando getTimeParting : el plug-in de Adobe SiteCatalyst

En el día de hoy me ha tocado actualizar el plug-in de Adobe SiteCalayst getTimeParting. Para los que no lo conozcan, y como su propio nombre indica, te permite "partir el tiempo". En otras palabras, en lugar de tener un campo con todo el tiempo del tipo: "1460654529097" o "Thu Apr 14 2016 19:23:16 GMT+0200", lo que te permite hacer este plugin, es que puedas almacenar partes del tiempo, como las horas, o las horas y los minutos, o los meses, o el tipo de días de la semana, por ejemplo, en tus variables personalizadas.

De esta manera, podemos hacer informes por fines de semana o laborables, o por meses, o por miercoles, o lo que se nos quiera ocurrir. En el caso que me ocupa, sólo hemos recogido el día, es decir, si era lunes, martes,.... pero en inglés (Monday, Tuesday, Wednesday, Thursday,....), la hora y los minutos en formato 9:00AM, así como el tipo de día, es decir, si era día de la semana o fin de semana (weekday o weekend).

La documentación del plugin la tenéis en la siguiente URL: Adobe SiteCatalyst plug-in

Y yo, para poder hacer la actualización, me he basado en esta página:  webanalyticsland

Para probar el javascript on line, he utilizado la siguiente pagina: webtoolkitonline

Al final de este artículo os dejo los archivos que he utilizado, ya que no se me formatea muy bien el código en el blog :(

El código de la función es el siguiente:

 getTimeParting=new Function("h","z",""  
 +"var s=this,od;od=new Date('1/1/2000');if(od.getDay()!=6||od.getMont"  
 +"h()!=0){return'Data Not Available';}else{var H,M,D,U,ds,de,tm,da=['"  
 +"Sunday','Monday','Tuesday','Wednesday','Thursday','Friday','Saturda"  
 +"y'],d=new Date();z=z?z:0;z=parseFloat(z);if(s._tpDST){var dso=s._tp"  
 +"DST[d.getFullYear()].split(/,/);ds=new Date(dso[0]+'/'+d.getFullYea"  
 +"r());de=new Date(dso[1]+'/'+d.getFullYear());if(h=='n'&&d>ds&&d<de)"  
 +"{z=z+1;}else if(h=='s'&&(d>de||d<ds)){z=z+1;}}d=d.getTime()+(d.getT"  
 +"imezoneOffset()*60000);d=new Date(d+(3600000*z));H=d.getHours();M=d"  
 +".getMinutes();M=(M<10)?'0'+M:M;D=d.getDay();U='AM';if(H>=12){U='PM'"  
 +";H=H-12;}if(H==0){H=12;}tow=parseFloat(D);tow=(tow<5)?'Weekday':'We"  
 +"ekend';D=da[D];tm=H+':'+M+U;"  
 +"if(h=='h'){return H}if(h=='d'){return tm}if(h=='w'){return tow}}");  

Recodad, que según la documentación de Adobe, antes de este código, en el s_code, en la parte "CONFIG SECTION", teneis que poner el array s._tpDST de vuestra localización que en mi caso era el siguiente:

 //Europe  
 _tpDST = {  
 2012:'3/25,10/28',  
 2013:'3/31,10/27',  
 2014:'3/30,10/26',  
 2015:'3/29,10/25',  
 2016:'3/27,10/30',  
 2017:'3/26,10/29',  
 2018:'3/25,10/28',  
 2019:'3/31,10/27'};  

Por último, y tal y como indica webanalyticsland, si queréis almacenar este "tiempo partido", debéis de hacer lo siguiente antes de poner la función:

 s.prop1=s.getTimeParting('h','+2');  
 s.prop2=s.getTimeParting('d','+2');  
 s.prop3=s.getTimeParting('w','+2');  

De esta manera, se os almacenará en las propiedades 1,2 y 3, respectivamente, la hora, el día de la semana y el tipo de semana.

Como no se ve bien el formato al pasarlo al html, os pongo los enlaces de los archivos que he utilizado:

- html que llama al archivo javascript timeparting.js
- archivo javascript timeparting.js
- archivo js de pruebas en webtoolkitonline.

Saludos.